Beginner-Friendly Home Design Software
Home layout design software for beginners with easy to use interface – Home layout design software for beginners with an easy-to-use interface empowers aspiring homeowners and interior design enthusiasts to effortlessly create their dream spaces. This guide explores user-friendly software options, essential features, and step-by-step instructions to help you navigate the design process with confidence, transforming complex layouts into visually appealing and functional homes. We’ll delve into the key aspects that make these programs accessible and enjoyable for those new to home design, eliminating the intimidation often associated with professional design tools.
From understanding intuitive drag-and-drop interfaces to mastering the addition of furniture and décor, we aim to provide a comprehensive resource for anyone looking to embark on their home design journey. Whether you’re planning a complete renovation or simply rearranging your existing furniture, this guide will equip you with the knowledge and tools to achieve your design goals effectively and creatively.
Top 5 Beginner-Friendly Home Design Software Options

Source: planner5d.com
Choosing the right home design software can significantly impact your project’s success. A user-friendly interface is crucial, especially for beginners. This section explores five popular options, comparing their ease of use, features, and pricing to help you make an informed decision. We will also provide simple step-by-step instructions for creating a basic floor plan in each program.
Software Comparison Table
The following table summarizes key features, pricing, and user ratings for five beginner-friendly home design software packages. Note that pricing and ratings can change, so it’s recommended to check the software websites for the most up-to-date information.
| Software Name | Key Features | Price | User Rating (Approximate) |
|---|---|---|---|
| Planner 5D | Intuitive drag-and-drop interface, 2D and 3D views, large object library, mobile app availability. | Free version with in-app purchases for premium features. | 4.5 stars |
| Roomstyler 3D Home Planner | Easy-to-use interface, extensive furniture catalog, collaboration features, renders realistic 3D images. | Free version with paid subscription for advanced features. | 4.2 stars |
| SketchUp Free | Simple interface, suitable for basic floor plans and 3D models, large online community for support. | Free (web-based version). | 4 stars |
| HomeByMe | User-friendly interface, 2D and 3D design capabilities, large furniture library, community features. | Free version with paid subscription for advanced features and higher resolution images. | 4.3 stars |
| Sweet Home 3D | Open-source software, simple interface, intuitive drag-and-drop functionality, large library of objects. | Free. | 4 stars |
Interface Design and User-Friendliness
Each software prioritizes a user-friendly interface to cater to beginners. Planner 5D, for example, utilizes a drag-and-drop system, making it easy to place walls and furniture. Roomstyler 3D Home Planner’s catalog is well-organized, allowing for quick furniture selection. SketchUp Free, despite its simplicity, offers a clean and uncluttered workspace, minimizing distractions. HomeByMe and Sweet Home 3D also boast intuitive interfaces, employing straightforward navigation and tools.
These features reduce the learning curve and enable users to quickly create basic floor plans.
Creating a Simple Floor Plan: Step-by-Step Instructions
The following Artikels the steps for creating a simple floor plan in each software. These are simplified examples; each software offers a wide range of additional features and customization options.
Planner 5D
Creating a basic floor plan in Planner 5D involves these steps:
- Select the “New Project” option and choose your desired room dimensions.
- Use the “Walls” tool to draw the perimeter of your room.
- From the “Objects” library, drag and drop furniture into the room.
- Adjust the position and size of furniture as needed.
- View your design in 2D and 3D modes.
Roomstyler 3D Home Planner
Roomstyler 3D Home Planner offers a streamlined process:
- Start a new project and select the room type.
- Utilize the intuitive wall-drawing tool to define the room’s layout.
- Browse the extensive furniture catalog and drag desired items into the room.
- Customize furniture placement and adjust room dimensions.
- Generate a 3D rendering to visualize the final design.
SketchUp Free
Creating a floor plan in SketchUp Free is straightforward:
- Begin a new project and select the appropriate template.
- Employ the line tool to draw the room’s walls.
- Use the “Push/Pull” tool to add thickness to the walls.
- Import or create simple furniture models.
- Rotate the model to view from different perspectives.
HomeByMe
HomeByMe provides a user-friendly experience:
- Create a new project and define the room’s dimensions.
- Use the wall-drawing tools to Artikel the room.
- Select furniture from the extensive library and place it within the room.
- Adjust the placement and orientation of furniture items.
- Switch between 2D and 3D views to check the design.
Sweet Home 3D
Sweet Home 3D’s intuitive interface simplifies the process:
- Start a new project and set the room dimensions.
- Use the wall-drawing tool to create the room’s structure.
- Select furniture from the library and drag it onto the floor plan.
- Adjust furniture positions and sizes to your preference.
- Generate a 3D preview to visualize the final outcome.
Essential Features for Easy Home Layout Design

Source: thecoolist.com
Designing your dream home shouldn’t be a complicated process. Beginner-friendly home design software simplifies this task by offering intuitive tools and features that streamline the design process. This makes it accessible to everyone, regardless of their prior experience with design software. The key lies in selecting software with features that are both powerful and easy to understand.
Several essential features contribute to a user-friendly experience. These features significantly reduce the learning curve, allowing beginners to quickly grasp the basics and start creating their ideal home layouts.
Intuitive Interface and Navigation
A well-designed interface is paramount for ease of use. Clear menus, easily accessible tools, and a logical layout significantly reduce the time spent navigating the software. Visual cues, such as tooltips and contextual help, should be readily available to guide users without interrupting their workflow. A clean and uncluttered design prevents overwhelming beginners with too much information at once.
Drag-and-Drop Functionality
Intuitive drag-and-drop functionality is a cornerstone of user-friendly home design software. This feature allows users to effortlessly place and rearrange furniture, walls, and other design elements by simply clicking and dragging them into position. This eliminates the need for complex commands or precise measurements, simplifying the design process and making it more enjoyable. The immediate visual feedback allows for quick adjustments and experimentation, fostering a more interactive and intuitive design experience.
Pre-designed Templates and Libraries
Offering pre-designed templates and extensive libraries of furniture, fixtures, and materials significantly reduces the initial design burden. Beginners can quickly select a template that closely resembles their desired home style and then customize it to their liking. Access to a wide variety of options in the libraries allows for personalization and creative exploration without the need to create everything from scratch.
Real-time 3D Visualization, Home layout design software for beginners with easy to use interface
Real-time 3D visualization provides an immersive preview of the design as it evolves. This allows users to see their choices reflected instantly, facilitating a more intuitive understanding of scale, proportion, and spatial relationships. The ability to walk through the virtual space enhances the design process, transforming it from a static 2D plan into an engaging 3D experience.
Easy Measurement and Editing Tools
Simple and accurate measurement tools are essential for creating realistic and functional designs. The software should allow for easy input of dimensions and provide visual feedback on the size and placement of elements. Intuitive editing tools, such as resizing, rotating, and deleting elements, allow for seamless modifications throughout the design process, enabling users to easily correct mistakes and refine their creations.
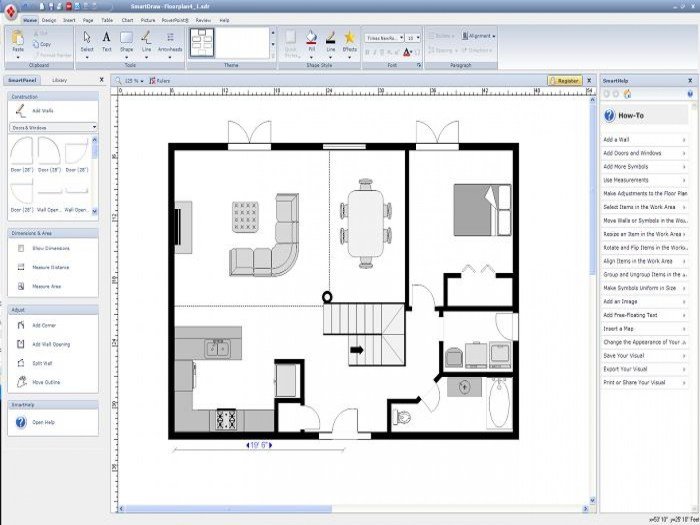
Sample Interface Design
Imagine a clean, light-grey interface. The top toolbar features clearly labeled icons for common actions: “Add Wall,” “Add Door,” “Add Window,” “Add Furniture,” and “3D View.” A palette on the left displays various furniture categories (e.g., sofas, chairs, tables) with thumbnail previews. Dragging an item from the palette onto the main workspace instantly places it in the design.
The workspace itself is a large, interactive area where users can freely manipulate elements. A ruler tool displays measurements as elements are placed. A small window at the bottom displays the current room dimensions and total square footage. In the upper right corner, a button toggles between 2D and 3D views, providing a seamless transition between planning and visualization.
The overall aesthetic is modern and uncluttered, emphasizing usability and functionality. The color scheme is consistent and calming, avoiding overwhelming bright colors. Tooltips appear upon hovering over icons, providing brief explanations of each function.
Creating a Basic Home Layout: Home Layout Design Software For Beginners With Easy To Use Interface
Source: getdrawings.com
Designing your dream home can be exciting, but starting from scratch can feel overwhelming. This step-by-step guide will walk you through creating a basic home layout using user-friendly home design software, equipping you with the skills to efficiently plan your space. We’ll focus on intuitive tools and features to simplify the process and help you visualize your ideal home.
Software Setup and Initial Floor Plan
Begin by installing your chosen beginner-friendly home design software. Most programs offer a tutorial or walkthrough upon launching. Next, you’ll need to input the dimensions of your property. This typically involves entering the length and width of your house and any significant structural features like existing walls or pillars. A typical software interface will provide a grid to represent the space, where you can then begin to define the rooms.
Imagine a screen showing a grid with a rectangle already drawn, representing the outer walls of your house, ready for you to begin dividing it into rooms.
Defining Rooms and Walls
Now, it’s time to define the individual rooms within your home. Most software offers a ‘wall’ tool, usually represented by a line icon. Click and drag this tool to create the walls of each room. You can easily adjust the wall lengths by clicking and dragging the endpoints. Pay close attention to the dimensions displayed by the software as you work.
Remember to account for doorways and windows, which are typically added as separate elements, allowing you to specify their dimensions. A screenshot would show a grid with several rectangular rooms drawn, clearly separated by lines representing walls.
Ensure your walls are accurately sized and placed to reflect the actual dimensions of your property. Inaccurate measurements will lead to miscalculations later in the design process.
Adding Doors and Windows
Once the walls are defined, add doors and windows using the respective tools within the software. These tools are usually represented by icons of doors and windows, respectively. Click and drag these tools onto your walls, adjusting their size and placement as needed. The software should provide a clear visual representation of how these elements fit into your layout.
A screenshot would depict the previously drawn rooms now with appropriately placed doors and windows.
Consider the placement of doors and windows carefully. Strategic placement can enhance natural light and improve the flow of traffic within your home.
Furniture and Decor Placement
With the basic structure complete, you can begin adding furniture and decor. Most software provides a library of pre-designed furniture items. You can drag and drop these elements onto your floor plan, adjusting their size and position using your mouse. The software often allows you to rotate objects for optimal placement. A screenshot would showcase the floor plan with various pieces of furniture, such as beds, sofas, and tables, positioned within the rooms.
Remember to maintain a sense of scale and proportion when placing furniture. Avoid overcrowding rooms, and ensure there is sufficient space for movement.
Fine-tuning and Refinement
Once all the furniture and decor are placed, take some time to fine-tune the layout. Adjust the position of items to optimize the flow and functionality of each room. Experiment with different arrangements until you’re satisfied with the overall design. You might find that minor adjustments can make a significant difference in the overall feel of your home.
A final screenshot would show a refined floor plan, with furniture and decor arranged in a cohesive and aesthetically pleasing manner.
Don’t hesitate to experiment! The beauty of home design software is the ability to easily move and adjust elements until you achieve your perfect layout.
Final Review

Source: makeuseofimages.com
Designing your home should be an exciting and rewarding experience, and with the right software, it can be. By focusing on user-friendly interfaces and essential features, beginner-friendly home design software eliminates the technical barriers and allows you to concentrate on the creative aspects of transforming your vision into reality. This guide has provided a foundational understanding of how to leverage these tools effectively, empowering you to create a home layout that perfectly reflects your personal style and needs.
Remember to explore the various software options, experiment with features, and most importantly, enjoy the process!
Essential Questionnaire
What is the average cost of beginner-friendly home design software?
Prices vary greatly, from free options with limited features to paid software with advanced capabilities, typically ranging from free to a few hundred dollars for a one-time purchase or subscription.
Can I import existing floor plans into the software?
Many programs support importing floor plans from various formats (e.g., DXF, JPG). Check the software’s specifications to confirm compatibility.
How do I save my designs?
Most software offers various saving options, including cloud storage, local file saving, and image exports (e.g., PNG, JPG).
What kind of technical skills do I need to use this software?
Beginner-friendly software is designed to be intuitive and requires minimal technical expertise. Basic computer skills are generally sufficient.